Nov 29, 2012

Gift wrapping for Christmas, birthdays, wedding, love


Holiday season started and these days we are thinking more and more about the  New Year's Eve and Christmas. And, of course, gifts for our family, friends, loved ones. I am always much more excited to see if I chose the right gift, whether it brought joy to my loved ones, than looking forward to unwrap mine.

Wrapping gift is almost as important as buying/making them. If you don't have time or inspiration to make something by yourself, at least you can try to be original with wrapping. It is easy to buy, but investing our creativity, imagination and time we show that we do care for others giving them a part of ourselves.

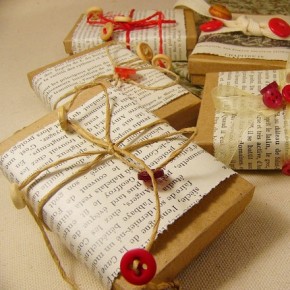
Recycled material is something I prefer. Here are some examples (and tutorials) how to wrap gifts with the material you can easily find at home.


Newspaper bowl gift wrap


Furoshiki

I 've always loved book stores and at least once a week I spend some time in one of them, reviewing what is new, particularly on the shelf with crafts books. Few month ago I accidentally came across a book about furoshiki and was honestly thrilled with it. It is 
the art of Japanese cloth wrapping and has been a part of daily life in Japan for centuries.  It originated as a way to bundle clothes  for easier transport, and evolved into the art.    Official Furoshiki site     offers  comprehensive tutorials on how to wrap different items such as wine bottles, books and more.   Some of examples follow:


Read more "Gift wrapping for Christmas, birthdays, wedding, love"

Nov 14, 2012

Chalkboard everywhere


 Last few weeks I became a 'chalkboard' freak. Refurbished kitchen using chalkboard paint, then made a frame for notes (you can find this tut in  my post here) , painted inner sides of desk's doors. And found this awesome  tutorial how to make chalkboard wrapping paper . I love the possibilities chalkboard gives me - I can change the images, text, chalk colors, and get renewed interior. 
Read more "Chalkboard everywhere"

Nov 11, 2012

DIY shabby chalkboard frame


A couple of weeks ago I got few wooden picture frames from my neighbor and decided to make chalk board. Yes, we all have mobile phones, send text messages and emails, but I recognized the advantages of the  old-fashioned chalk board near the entrance door - hubby can't have excuse now: 'I forgot my glasses, couldn't read the message.' And one of the wooden frames was ideal for that.
On the photos you can see the final result, and tutorial how I made it find after the jump.

Read more "DIY shabby chalkboard frame"

Oct 31, 2012

How to choose between roller and brush


Is is better to paint using roller or brush? This question I asked myself a lot of time when refurbishing furniture. And  tried with various rollers and brushes to see what works best for me. I love water based, acrylic paint. For larger surfaces, with fine velur roller I achieve the best results (and much faster than with the brush). But, for oil-based paints, as they are a little bit 'sticky', roller is not so good -  fine, good quality pure-bristle brush works better for me. Sponge brushes I found good for corners, in the combination with rollers. Anyway, it is important to pay attention on the brush or roller material, as I wrote in the post How to choose paint brushes  - general rule: use polyester roller/brush for water-based paint and natural material for oil-based paint. And try different tools to get filling. You can always repaint and make changes.     My hubby sometimes doesn't like the color or technique I choose, and I always answer him: Never mind, I can always repaint it if I am not happy with  the final result. And few time I really did - something immediately, some pieces of furniture after a year or two, either I didn't like them any more, or changed the overall style or color of the space.
Read more "How to choose between roller and brush"

Oct 26, 2012

Paper bead jewelry


I am always working on few parallel projects. Sometimes it is OK, I need to rethink about the next step or simply, wait for paint to dry. But sometimes, I am eager to finish everything and have too much on the agenda. I am writing this because I was frustrated this morning when remember that started paper bead necklace few month ago and did't have time to finish it (and needed just the like the unfinished one). Paper is definitely my favorite material. And how to make paper beads and make various jewelry pieces you can find on the paperbeads site. I discovered it recently and love the pieces and tuts I found there.

Read more "Paper bead jewelry"

Oct 23, 2012

Wonderful news - I am on Totally Tutorials!

I am thrilled my post is published on Totally Tutorials. As a new Blogger it is difficult for me to reach to the people and have followers or readers. Hope this would help, and more surfers will find my blog useful. I learned a lot reading other sites and hope my blog will help somebody else providing some interesting information.
Read more "Wonderful news - I am on Totally Tutorials!"

Oct 19, 2012

How to choose paint brushes


Synthetic or natural bristle brushes?


When painting furniture people (myself too) usually pay attention to choose the right paint - color, type, supplier. For a long time I didn't take take what type of brush to choose. But if you want to achieve the professional look, this is important as well. Basically, the choice of the right brush depends on the paint you are using: for water-based (acrylic) paint, use synthetic - polyester or nylon bristles. Oil-based paints apply best with natural or pure bristle brushes. The natural fibers absorb water, swell up and lose their shape, so using them with water-based paints will cause poor result. On the other hand, 
when using a synthetic brush with an oil-based paint the solvent in the paint slightly melts the polyester or nylon hairs of the brush, clumping them together. 

After this initial choice, there are number of other features to look, like eg. density (better brushes have more bristles and they are tapered) or length, but you need some experience to see what works bets for you. What is easy to test for everyone is to try tug a few bristles out of the brush - if this is done easily, take some other brush. I have three furry pets always moving around me, and I am used to struggle with hairs left on the paint film, but honestly, this is not what I like, and what is appreciated after all preps yoe9ve done. So, choose the good brush and enjoy your work. 


Read more "How to choose paint brushes "

Oct 10, 2012

Pumpkin, squash, pumpkin


Fall has arrived and  surprised us again with all these beautiful colors. Every Saturday I visit local market and enjoy the variety of vegetables and fruits, and this month, the color, shapes, sizes of pumpkins and squashes. In my country (Croatia, Europe)  Halloween is not part of the tradition, but we love squashes and make meals, soup, cakes and  keep them as decoration as well.


Delicious pumpkin soup


This delicious cream soup is very easy to make, but one of the best you'll ever taste. Read the recipe and enjoy!


Read more "Pumpkin, squash, pumpkin"

Oct 8, 2012

Furniture makeover - Wood stains


I love trees - you can see that from the blog title. And I love wood and wood grains to be visible on furniture, if possible. When refurbish some old piece, I usually  plan to use stain and to have grains visible. It is not always possible for many reasons - item condition, previous paint layers, too much (manual) sanding efforts. Recently, I decided to stain a table and bought a water-based wood stain. From the beginning I felt something is wrong, the result was too opaque. And then, started to google of course, and found out there are basically two different types of wood stain: 
- low-build wood stains allowing enhanced wood structure appearance  (on the picture above) and 
medium or high-build stains that are rather opaque.


Not to mention that there stains dedicated for exterior and those for interior, etc. But, talking about the impression, take care about the opacity. After all those sanding and preparations, right stain should be applied.

The positive thing is, I now know now that, even if there are imperfections I can't avoid for some reason, I can still use stain (medium-build this time) and get grain at least moderately visible.
Read more "Furniture makeover - Wood stains"

Oct 3, 2012

DIY Shabby-looking sign


Shabby chic furniture look has been very popular last years, and for the reason. It is particularly convenient for the hobby crafters and  beginners as you don't need to be master to refurbish something old  and get astonished new piece of furniture. That is one of the reasons I like it as well. The other is sense of romance this style brings to my home. But personally, I think it should be a little bit careful and not to overdo to use it. I prefer more modern style with some romantic details and space overcrowded with flowers, pillows, curtains,  shabby chic pieces is not what I would choose.
This shabby-looking sign is detail I painted in my kitchen, above the window. 
It is very simple project and see how I did it.


Read more "DIY Shabby-looking sign "

Sep 25, 2012

Amazing laces


Pag lace


Fall has begun, fashion theme articles, magazines, portals are inviting us to malls and clothes shops. Lace is 'must have' in wardrobe. That reminds me on the art of hand-making lace in Croatia, where I live. We are small country, but there are even three main centres of lacemaking in Croatia, whose work is a continuation of the long-lasting lacemaking tradition. These are: Lepoglava in Hrvatsko zagorje (west-northern part of the country) with bobbin lace, island Pag on the Adriatic see with needle point lace and island Hvar with aloe lace. They are all inlisted on UNESCO representative list of intangible Cultural Heritage of Humanity. It is impossible to say which one is more beautiful, for me they are all breathtaking and astonishing. 
When I see such handmade art, I feel embarrassed looking at my own craft work. But it is not appropriate at all to compare masterpiece with some hobby craft. Just enjoy the art and lace masterpieces.


Lepoglava lace 


Hvar lace from agava


Read more "Amazing laces"

Sep 19, 2012

Hanger out of pockets


Few weeks ago I was cleaning a closet - what to keep, what to throw away, what to pack for the charity. First decided to get rid of the old linen jacket I haven't worn in years. At the last momment, I got the idea to use the pockets for a hanger. This is tutorial how I did it. Now I am searching the closet for some other old things with pockets to  make another hanger. The real challenge is to convince my hubby to get rid of old stuff.


Read more "Hanger out of pockets"

Sep 11, 2012

Paper basket


I've been very busy lately, working simultaneously on few projects. I am taking photos to use them in tutorials, hope this will be done soon. One of my 'projects' is also tidying up  the closets.  I found this interesting recycled paper basket on Design*Sponge. I am planning to make some, when finish other on going tasks, to make  better order in my closets and on shelves. Hope my hubby won't freak out, as usually, when I am reorganizing the house.

Find tutorial here.
Read more "Paper basket"

Aug 28, 2012

Furniture makeover - Sanding and Preparations

Preparations

Step 1: First, have a good look of the item you are planning to work on - review the damages, general condition, if there is any sign of wood worms (do you see little holes in the wood somewhere), current layers of paint. Review it from all angles.  Think over is it necessary to dissemble the piece, and what parts (eg. cabinet doors, legs, drawers, shelfs) and are you going to assemble these parts again or not. 

Step 2: Before dissembling,  take photos, make notes - I usually take photos, to remind me on the 'before' look and to help me when assembling - it is amazing how  easy is to be confused with things looking very simple at the first place. It is also useful to mark pieces, eg. drawers, to be put on the same place as before, as the size could little, but significantly, vary.

Step 3: Check also locks, keys, handles, rosettes - are they functioning, do you need them or want to replace them. Eg. it is easier to replace  lock before you start painting.

Step 4: If you noticed wood worms presence, you need to treat the piece - I usually use some of the chemical insecticides - follow the supplier's  instructions.

Step 5: One of the first things to do is to clean the piece with soap water to get rid of the stains, fat, dirt ... Then, think about old paint layers - do you need just to make some sanding or completely remove them. It depends also on your idea how to refurbish this piece of furniture. But, whatever you decide, some sanding is difficult to avoid.

Step 6: Sanding, sanding, sanding; and repairing small damages using filler.


Read more "Furniture makeover - Sanding and Preparations"

Aug 23, 2012

Furniture makeover - How to start 2

Your first piece candidate for makeover


Space make over and furniture refurbishing is  my favourite hoby. And it is not such demanding as it could look like on the first site. But hot to start? Every beginning is rather difficult and could be confusing. But don't give up even before you actually start! It is always necessary to gain experience. So, start with something rather simple and small - wooden box, small shelf, simple chair, picture frame, ... If you are not happy with the result, you can always repaint it. I think everybody has such experience. When you see astonished refurbished pieces, remember that people who did it also had some failures experimenting with new techniques.
If you decided to work on a larger piece or having dilemma to take some item on a flee market or garage sale, look first at the basic piece skeleton - if it is in  good condition. Than think over do you have enough experience, tools and available help/assistance to makeover the piece. It is sometimes better to take one step at the time.

When I started to work on  furniture, I made a whole plan for that piece, bought a paint and other material before I actually begin to work. But than I realized that it is better to be patient and first do the surface preparations - meaning cleaning,  dismantling,  sanding,   repairing damages. Only after this initial effort I can see and feel  the wood - could I use stain or is the paint better, is it better to replace some parts or elements or to use it in some other way, how to decorate. And rather often I completely change the initial idea. Admit, sometimes just because sanding over all current layers is too challenging, sometimes I got a quite a new idea. This is how it works for me, everybody has to find its own way.

Read more "Furniture makeover - How to start 2"

Aug 22, 2012

Furniture makeover - How to start 3

About paint


The most frequent materials for painting the wood include paint, woodstains, varnishes, waxes (and other products related to particular techniques).

But, before you start painting, it is usually necessary to prepare wood surface, depending on the technique to be used. 

Gesso

Gesso is a water based, heavily-pigmented white primer used as a sealer on porous surfaces such as wood. It is excellent base for techniques that require smooth background. It is applied with a flat brush or roller. Once it has dried it is sanded with fine sandpaper. Usually, at least one more coat of gesso is applied (each one has to be sanded down).
Remeber that it is opaque, so it is not used if you plan to enhance the grain of the wood.

Sealer


Sealer prepares a wood surface by sealing it; it prevents wood to absorb too much paint.  It is transparent allowing the grain of the wood to show through.

Woodstains


Woodstains are liquid pigments that dye wood  - they are transparent, allowing wood grain to show through. They can be water based, oil based or alcohol based. The less porous wood require alcohol-based tints, for other any stain will do.

Paints


Now days a wide range of  paints is available in stores. Basic types for crafters are acrylic (water based) and oil-based. My preferable choice are acrylic paints as they  are very easy to use, odorless, dry quick, and, what is the most important for me, tools and brushes could be very easy cleaned under running water. Brushes used with oil-based paints must be cleaned with mineral spirit and this is issue for me - I've never succeeded to completely clean brushes used with oil paints. I would certainly recommend acrylic paints, particularly for the beginners.


Varnish

Varnish is a transparent paint that dries to a hard, shiny surface which protects wood. Varnishes can be classified according to their finish: Glossy - high sheen effect; satin - the most versatile (medium sheen); matt finish - no sheen,  for more rustic look. Varnishes can be oil-based, water-based (acrylic), polyurethanr, naturals. As for paints, I recommend acrylic varnishes.


Read more "Furniture makeover - How to start 3"

Aug 21, 2012

Furniture makevover - How to start 1


My holidays are over, I have to go  back to work, and to my 'other' work too - I am taking my hobbies very seriously. Of all things I am working on, furniture makeover is my favorite. I started this accidentally, but fell in love realizing the creativity potential. Decorating wood is one of the best ways to forget the stress of everyday life.


This furniture on the photos I refurbished during past couple of years turning ugly and rather damaged pieces into a furniture I love.

But how to start if you are a beginner?

First of all, you need some tools and material, most of them probably you already have, the other  could be obtained from a do-it-yourself or hobby  store or local hardware store.


Read more "Furniture makevover - How to start 1"

Jul 25, 2012

Cardboard furniture


Surfing the internet, I accidentally  found a very interesting site describing how to make furniture from cardboard. Foldschool is a collection of free cardboard furniture for kids (and for adults), handmade by you. The downloadable patterns can be printed out with any printer. Follow the instructions and assemble a stable piece of furniture. I haven't tried yet but plan to do (I always plan too many things and projects). I see a great potential to create something original for my home.
Read more "Cardboard furniture"

Jul 24, 2012

Handmade Paper roses


Sometimes the easiest and most simple things can make a big difference. I started to make those roses just for fun, but realized how they can be usefull and decorative in many situations.


With this beautiful paper roses decorate your home and bring sent of romance in your day! How to make them, read after the jump.


Read more "Handmade Paper roses"

Jul 23, 2012

Making paper


 I've always been fascinated with paper products of all kinds - notes, bags, toys, paper sheets, jewelry, serviettes, … What fabulous things could be made of a simple paper sheet - just look for origami or paper mache or scrap booking. Nowadays, when it is so available, we are not paying attention on it, but imagine for a moment, how our life would look like without it. Like an old friend we were taking for granted and shocked when he/she left us for some reason.


Is making paper industry, craft or art? Or all of that? Is the tradition preserved? Read some information about making paper. And, not to forget, you can play creating handmade paper. I like to add seasonal flowers from my garden treasuring their beauty within the paper sheet.


Read more "Making paper"

Jul 20, 2012

Petal paper flower


Whether You'd like to decorate birthday gift, wedding table, bring joy or sent of the nature  in your home, cheer up friends (or yourself), paper flowers are here.  They are low-cost, beautiful and colorful, and, of course, easy to make. Guys, if you forgot to buy flowers for your girl/wife, make one, she'll be delighted. It is easy to buy them (if you remenber), but the time and creativity you spend doing something yourself, that is priceless.
Look the petal paper flower tutorial.


Read more "Petal paper flower"

Jul 18, 2012

Paper lanterns


It is summer time, yeeeeeeeeee, so spend it outside. If you have a garden, backyard or just a balcony, those lanterns can add romance to your evenings. Paper lantern tutorial is easy to follow, make them yourself.
Read more "Paper lanterns"

Jul 13, 2012

Paper mache necklace


          Paper is one of the most versatile materials. I've always been fascinated with paper products of all kinds - notes, bags, toys, paper sheets, jewelry, serviettes, … What fabulous things could be made of a simple paper sheet - just look for origami or paper mache or scrap booking.

 Recognize the situation: dressed up, in a hurry, hubby is freaking out, but you can't find adequate piece of jewelry - necklace, brooch or earrings? It is time to end such stories - make beautiful pieces by yourself.  It is easy and fun to design and make original jewelry and costs almost nothing.

Read tutorial how to make this paper-mache necklace.

Read more "Paper mache necklace"

Butterflies and creativity


       Few days ago I was watching excellent documentary film about butterflies. I 've always admired their beauty, colors and magic, unfortunately noticing there are less and less of them to be seen. I can't remember when was the last time I saw the Swallowtail (on the photo) - it was my favorit one in the childhood. Beside the magic of their wings, their transformation from caterpillar is probably one of the most fascinating experiences in the nature.

What is the connection between butterfllies and this blog? It is dedicated to the butterflies inside us. With a little creativity, research, trying new things we can transform ourselves and our home, bring a special sent to clothes, furniture, home. Take new path and new challenges (and allow yourself a failure, from time to time), take a transformation.
Read more "Butterflies and creativity"