Showing posts with label Misc. Show all posts

Jan 13, 2015

Angels to keep you creative


Happy and creative New Year dear fellow crafters! I love angels and love making them. This easy to make tutorial I found on this site. Even beginners in crochet will be able to make them.


Read more "Angels to keep you creative"

Oct 12, 2014

Digital storytelling for crafters


Crafters and Bloggers love photos and videos, but how to make them? What software to use, how it works, is it expensive? And how to combine photos, video, music, speach?
I recently attended amazing course on Coursera, I woudl recommend to anyone. If you miss this opportunity in October, visit the site Digital Storytelling where you can find tons of materials and tuts. Good luck, enjoy!
Read more "Digital storytelling for crafters"

Aug 21, 2014

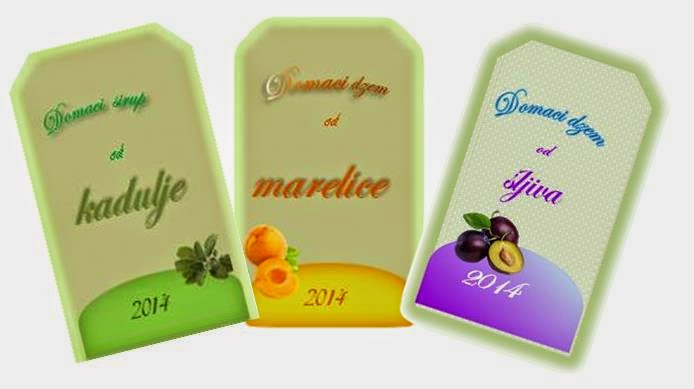
Create your own jam labels or tags using MS Word


There are thousands of label examples on the net, but i usually have my own idea, or the label I like the most can't be customized. One afternoon I tried to create label by myself, using MS Word (2010). It wasn't very easy ("&#%!@?!" for Microsoft), but neither so difficult. I prepared tutorial how to do it, just to remind you on the possibilities of the tool you probably have installed.


Tutorial how to create labels and tags using MS Word


The tutorial is related to Microsoft Word 2010 (I am mentioning that because, as usually, some features are improved, but for some of them, Microsoft made step back).

First, decide on the shape of your label.


On Insert tab use Shapes and choose the one you like - this time I added 'blue' shape (half circle).


You can change the size of the object buy dragging one of the small circles (green arrow) or you can rotate the object (red arrow) -  rotate this circle (of yellow color).


You can see that the object's size changed when dragged the small circle.


Changing color and outline


To pick up the desired color of the object, mist go to the Drawing Tools (upper right on the image).

Click on Shape Fill and pick up the color. Or you can choose No Fill if you don't want any color.


For the outline, procedure is very similar as above, only click on: Shape Outline. 


For  my labels, I chose the 'No Outline' option.

Want more sofisticated look? 


On the 'Shape Fill' pop up menu choose More Fill Colors for the color options or : Texture 

 รจ M ore Textures  for the other options available.


Now you can customize gradient, patterns, shadows, ... .  Try and play a little bit.


This is the example for the gradient.


And this is how to choose the pattern - I chose the dot pattern, of course.


Adding image and text


First step is to pick up image you like. I wanted to remove borders and how I did it read on my post here.

After you inserted the picture, right click on it - you'll get pop-up menu. Click on 'Wrap Text' and choose the Front of Text option. Now you can drag the picture on the created shape.


You  see the plums on the the shapes (previously I dragged the smaller shape and put it on the bigger one). 
To add text,  repeat steps Insert -> Shapes -pick up the Text box.


Input desired text, choose the font size and type. If you want additional customization, click on letter A  on the Tool bar - choose on of the offered options and, additionally, option Transform, if you like e.g. rounded text.


Label is finished. 


How to copy labels


Usually, I need more than just one label. The easiest way to copy it is first to select all 'parts' (select one by one and keep the Shift button pressed).


After selecting all components, click on the Group icon and choose Group. Now, you can Copy --> Paste your label as a single shape.


Hope this is helpful. may be there are some other ways to do some steps, I am constantly discovering  MS Word features or how to do something.


jar tag

jar tag


jar tag

jar label


Read more "Create your own jam labels or tags using MS Word"

May 14, 2014

How to erase or remove background from your photo - part two


This post is actually update of the previous post on the same topic. In the meantime I learned something new. First, the Clippingmagic is not absolutely free of charge any more - you can try it, but can't download photo without subscription: the lowest one is still very cheap - 2.99 $ for a one month usage and 15 downloads (15 photos edited, you can download as many intermediate results as you wish - this is quite sufficient for me) or 7.99 $ for 100 downloads per month.


How to improve the final result


Second, I would  like to show you how to improve the final result. Using Clippingmagic you can't achieve sometimes the result you expect - it depends on the background contrast and probably some other things. For the furniture pieces I couldn't get the straight edges everywhere. So, I used another (free) tool - PhotoScape to make corrections. Silly me, in the first place, used Clone stamps tool and Paint brush, but there is no possibility to draw the line with this tools. And, out of desperation, found easy and fast method - just used lines objects - this tool is present in the majority of photo editing software.

Photo above is related to the PhotoScape, but steps are the same in other software.

Step 1: Choose the 'line' shape

Step 2: Choose the white color of the the line (or the color of the background)

Step 3: Choose the thickness of the line (the very thin line probably won't work good enough)

Step 4: Draw the line just next to the edge you want to correct
Read more "How to erase or remove background from your photo - part two"

Mar 31, 2014

How to erase or remove background from your photo


Photos play important role for (almost all) bloggers, particularly crafters. For smaller pieces I use a large white cardboard as a background but furniture is always a problem for me, no such good place in the house to take a picture and be happy with the background. Recently I found this free software - Clippingmagic. For a long time I haven't been so thrilled with some product, and it is absolutely free. You don't even need to install it on the computer - just upload the photo and follow the instructions. It is extremely easy to use it, but if you need help, there are very detailed instructions.
Of course, there are some other products, Photoshop is one of them for sure, but it is commercial. And I couldn't get the satisfactory result using some other photo editing tools (not to mention the effort needed).


Some tips:

Take care to keep contrast between the main object and background you want to remove - it is much easier and faster to achieve the result (like on the photo above - dog is dark and the environment is light).

Update to this post find here.
Read more "How to erase or remove background from your photo"

Mar 19, 2014

How to organize your craft studio


Whether having large studio or just a corner in the kitchen, it is rather important to organize stuff - tools, materials, paints, on-going projects. Although I practise to use leftovers or supplies I already have for new projects, I can't resist to buy something new as well, some new strip, fabric, paint, beads ... And I am very frustrated when I can't find what I need (and know I do have it somewhere). So, it is spring, right time for the cleaning and organizing. There are a lot of beautifully  designed studios, but I didn't want to spend a lot of money or time at the moment and searched for the affordable, quick to implement, solutions.


Paper box with drawers - excellent for me, drawer lover - cheap, convenient, easy to setup.


I was using various plastic bags for leftovers and other material - and never knew what was where. So, I used ordinary transparent bags and sorted my strips and fabric - now I can spot immediately what I need. Jars could be used as well, but more place neede to hold them.


This awesome idea using cloth spines I found   here.


Actually, I have two 'studios' - corners where I am crafting - for sewing and for painting. This shelves used to organize tools for furniture makeover.


Pegboards are certianly my 'number one' choice to organize studios - so versatile and practical.
Read more "How to organize your craft studio"

Feb 13, 2014

Valentine's day last minute gifts


It is Valentine's day  tomorrow, but everyday is as good to show our love ones they are special to us. Here are some simple gifts and cards, easy to make, to give the people we love. I prefer fridge magnet above, I found it on this interesting site. Clothespins could be excellent material for crafting.


Valentines' day  cards 


Or just give a rose!


Read more "Valentine's day last minute gifts"

Jan 26, 2014

Paper daisies


Until yesterday we've had winter I've always dreamed of - average day  temperature around  12⁰ C  (not recorded in the last 150 years). Today completely different picture - snow fell white color prevails outside. But this is not the reason not to enjoy the flowers, if only paper ones, even better, as we can play with colors and forms.


This paper daisy is easy to make, find the tutorial below.


Tutorial how to make paper daisy


Material


- paper of your choice, glue, scissors, wooden stick or wire for the steam, cork


I trimmed cork to be cca 8 mm wide and cca 2,5 cm long.


Cut three pieces of paper 14 x 7 cm and cut the fringes. For the first layer fringes were 4,5 cm long, for the second one 3 mm longer, for the third layer another 3 mm loner.  


Put the glue on the part of the paper not 'fringed' and roll it around the cork. 


Repeat with the second layer - notice that fringes are 3 mm below the first layer. Repeat with the third layer.


Glue little button in the middle and green paper around the stick to get a steam and the flower is finished.


For more tutorials, look my previous posts:


Read more "Paper daisies"