Showing posts with label Sewing. Show all posts

Feb 28, 2015

Jeans tabouret


Jeans is so great material and I love it, so many possibilities for creative ideas. This time, I gave a new look to an old and ugly tabouret (in one moment I even decided to through it away, but changed my mind refurbished it). No, I can sit on it, put my legs on it when resting, use pockets for mobile charger or journals.

An old version of tabouret


New look


Read more "Jeans tabouret"

Jul 18, 2014

Cheerful Summer Bag


Finally finished this cheerful summmer bag. Birds you can see are brooches so I will be able to wear them in the winter, too, to make my day. Tut for brooches find in this post.

Just to give you a short input how I made it: 


Original fabric is upholstery fabric I bought in Ikea. 


Decided to painted it - used acrylic paints for fabric I already had.


I like to have pockets in the bag, so I made a lining with zipper pocket on one side and plain pockets on the other.


After the bag was finished, just put my birds on it.


Read more "Cheerful Summer Bag "

Jul 1, 2014

Felted birds brooch - multipurpose


felted birds brooch


Birds are singing all day long in my garden and i can't help it but make few felted birds brooches to put them on my purse or wear them as brooches. Read this tutorial below to see how it is easy to make them.


Tutorial how to make felted birds brooch


Material


material


Besides felt and fabric scraps, I used small buttons for eyes, double-sided iron-on vlieseline tape (to fasten scraps), filling and brooch pin.


felted birds brooch pattern


felted birds brooch patterns


First I draw the shape on the paper and cut it out - used it to cut two pieces from felt. Then cut 'wing' shape from fabric scrap, fasten it using double-sided iron-on vlieseline tape and sew it afterwards on the felt. Sew the button for the eye.


felted birds brooch layers


felted birds brooch layers


felted birds brooch layers


Now it is time to form the bird - put first back, then yellow piece for the beak, fillling, string for legs and front felt. Fasten it with the pin.


To make final stiching easier, I basted pieces first and then hand stiched it.

felted birds brooch pin


Finally sew the brooch pin at the back - I experimented a little bit  and found out that the best result is achieved with the pin put in the middle of the bird. 


Read more "Felted birds brooch - multipurpose"

Apr 12, 2014

Vintage leather bag with photos


How to get affordable, vintage leather bag (and not to spend a fortune)? With this question on my mind I started to think how I could make one. And this is the result. I bought a piece of soft dark grey leather at a great price and decided to make vera simple, messanger bag but with the addition of 'quilting' like fabric on the cover - that was the most demanding part to do. Inside the bag I sew cotton fabric lining with pocketc on the both sides, front and back.


Short tutorial how I made the vintage leather bag


leather bag bottom


It was easy to sew the 'body' of the bag. The with of the bottom I achieved sewing 'triangles' - as for the jeans bag.


vintage quilting photo


I spent more time to make the fabric cover. First I planned and draw the lines and shapes on the fabric, just to have the general idea (this was changed during the work). As the photo of my family, including our pats of course, was the central point, I started with it and, piece by piece, added fabric, decoupage and stitches, and some buttons at the end.


This is the finished fabric part.


Now it was time to sew it on the leather cover. I used cloth pins to fasten two pieces together.


To sew the second piece of leather, used office clips as well to fasten them.


The final tas was to sew the cover to the body of the bag - not very easy, as I have just a plain sewing machine, but the usage of special needle for the leather was a great help.
Read more "Vintage leather bag with photos"

Jan 19, 2014

Friendship scrolls


fabric friendship scroll


Although living in the digital era, having smart phones, tablets, notebooks - good, old paper is still very much alive. So, I made those scrolls for myself and my closest friends to keep common photos and memories.  I found the idea in the free ebook from the Cloth Paper Scissors site - it was a scroll to keep souvenirs from the journey. I used it for our friendship journey.


Tutorial how to make friendship scrolls


fabric friendship scroll


Use a piece of fabric, aproximately 33 x 11 cm. I prepainted an area for the photo as I had some isues with the transfer technique. Used photo transfer paper for the dark fabric. (Don't make the same mistake I did - read the instructions.)


fabric friendship scroll


After the photo tranfer was succesfully accomplished, I painted the fabric with the acrylic fabric paint and played a little bit with stencils.

fabric friendship scroll tutorial


This is the back side of the scroll. I also write some text - sentence about friendship.


fabric friendship scroll tutorial


For the scroll interior I printed calendar on the parchment paper and added a page of  handmade paper. On the calendar just marked our birthdays. I made four such pairs  and stiched them on the fabric 12 mm one after another.


fabric friendship scroll tutorial


fabric friendship scroll tutorial


Before stiching the paper, flipped the edge of the fabric and stitched it, put inside the wire. You can see it (left edge).


fabric friendship scroll tutorial


Finally, stitched the ribbon. The scroll is over. I printed some of  old photos and input them within the paper pairs. 


fabric friendship scroll tutorial


fabric friendship scroll tutorial


fabric friendship scroll tutorial


Read more "Friendship scrolls"

Dec 16, 2013

Patchwork bag


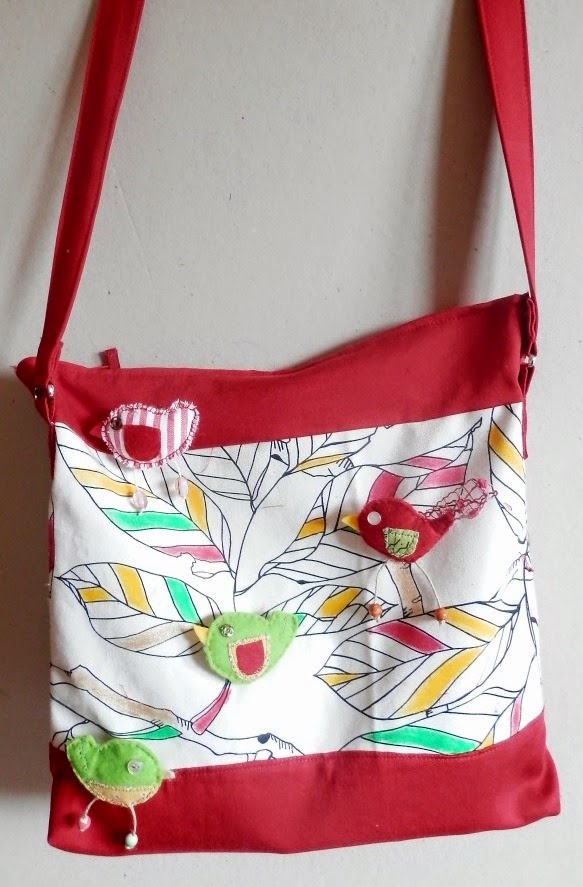
Never enough bags and purses. Designers' ones are too expensive for me, so occasionally I make them myself. This one is made by the pattern of Marcy Tilton I bought on Vogue patterns (this is not any advertising post). Used fabric scraps I found at home to play a little (it was realy fun) and add vibrancy to the bag.


Some more photos of the bag:


And this is the original:


Tips I learned making the patchwork bag

I used different fabric for the bag and, although I followed the instructions, the bottom didn't stay flat when caring the bag - had to put plastic (cut of the old plastic file)  under the lining to 'fasten' it.


Vogue patterns are different compared to Burda patterns, so read the instructions. main difference is that Burda patterns are drawn with the sewing lines while on the Vogue pattern you have 'cutting' line (with the seam allowance already included) and the sewing line. I have to say, Burda pattern is more suitable for me.

Read more "Patchwork bag"

Nov 10, 2013

Trolley shopping bag - something old, something new


My weekly ritual is visit to the green market where local farmers sell their product. I am going there for years and built a relationship with some of them. I know where to buy fresh cheese, who has the best carrot or potato, who's products are organic. And always buy over 1o kilograms, it's too heavy for me to carry bags. Trolley shopping bag is marvelous invention, I've been using it  more than 20 years. On the old one bag became worn out, metal construction was still good. And I decided to sew something original, and the bag that will match my requirements. This is the result, I am very pleased with the result (and that is not the case with all my projects). Here is the tutorial how I made it.

Trolley shopping bag DIY tutorial

Material:


- old jeans (I bought two pairs in second hand shop for 3,5 $)
 - leftover fabric
- eco leather (decided to buy it later on)


From back part of the jeans legs made front of the trolley.
Another trousers used for the back side.


This stripped fabric I used for the sides. The upper edge I strengthened with the nonwoven and two layers of the fabric.


I need big inner pocket of the shopping bag (this I couldn't find in any bag I could buy). So, I used jeans as well for the base and sewed original pocket to be used as one pocket and stripped fabric for another one. 


Stripped fabric fastened on the base together with the zipper (see photo).


For the lower end of the pocket I made a pleat, to be able to put in more things.


For the bottom of the bag decided to use eco leather. First pinned it, then hand stitched and finally sewed (twice, to be firm).


The original bag was made of synthetic material. Jeans is rather soft and heavy and the back side was not standing upright. Wire frame from the old bag I used to fasten the  front side. For the back side had several options and decided to make insert from the fabric and sponge and input the cardboard. 


Finally, used   eco leather to make the cap. Added some details in the meantime.

My trolley shopping bag :


Read more "Trolley shopping bag - something old, something new"