Sep 10, 2013

Pincushion in no time


For a long time I thought pincushions are just for decoration. I sew as a hobby, from time to time and found out that I am frequently loosing my needles, or can't find then when I need them - and pincushion is a great place to put them. 


Tutorial how to make pincushion

It is really easy, it took me more time to take photos and make this tut than to sew the pincushion.


First, cut four pieces 10 x 5 cm (or some other size) from the chosen fabric. 


Sew two and two pieces together.


Pin two sides together and sew the edges leaving one half of a side.


Reverse on the right side through the opening, stuff with filling and hand stitch the opening.


Sew the button (for decoration) and elastic band on the other side to put the cushion on the wrist, if you need.

Read more "Pincushion in no time"

Sep 8, 2013

How to remove white stains on furniture


white stain on furniture

white stain on furniture


I am in the 'cleaning' mood these days - it is warm but not hot here, no raining and just perfect weather to bring some order in the house. So, I moved all things from the big round table we have in the dining room and saw these nasty white stains. How to clean them?  - asked Google, of course. And found some interesting tips. First, tried with a mix of olive oil and vinegar - no result. Then tried with mayonnaise - no result again.


iron on white stain on furniture


The third attempt was bingo - took travel iron (because it is small and has no steam), old cotton rug and 'ironed' over the stain for a few minute. The result was amazing - stain was merely visible. Repeated with another one and now my table looks  almost as good as new.


Anyway,  If you decide to do the same, be careful and try first on a small spot. I am not sure why this worked for me and would it be as good on some other type of the furniture.
Read more "How to remove white stains on furniture"

Sep 2, 2013

How to clean and preserve brushes


When I began to refurbish furniture, read tons of material about paint, wood preparations, primer, fillers. I took brushes 'for granted', thought I knew enough about them. But after some bad experience figured out I have to improve my knowledge with this topic as well. First, learned which brushes to use with acrylic paint and which with oil one (see my post How to choose paint brushes). Cleaning and preserving brushes is important task, particularly if you buy better (and more expensive) ones, which I prefer. I usually use acrylic paint, cleaning tool is one of the reason - running water is the easiest way for that. With the solvent for oil based paint I can never achieve the same result. Be aware that tips below are just for the acrylic paint brushes.


Anyway, use cold running water to clean brushes immediately after the painting. Warm water will fix the acrylic resin (paint component) and paint will be sealed up for the metal part of the brush. After the washing, use paper towel or cotton rag to absorb the excess water and leave it to dry.

Keep brushes with the hair up.

From time to time it is good to make a bath for your brushes you are using the most: mix one tea spoon of sodium bicarbonate (or just one package of baking powder) with two dcl of water and put yout brushes in this solution, leave them over night. In the morning, rinse them thoroughly in cold water, use paper towel to absorb the excess water and leave them to dry. Soda releases oxigen which is very strong cleanser.

Read more "How to clean and preserve brushes"

Aug 25, 2013

Magnetic Flying Insect Door Screen


Every summer during our holidays at the seaside  we are fighting against mosquitoes - I've tried so far various sprays, tablets, ultrasound devices, screens, candles ... This year we accidentally found magnetic door screen - actually first saw short video in the mall (like TV sales). My opinion about such videos is very bad. But, as we tried everything else, decided to buy the screen. And we were thrilled. It was easy to put the screen on the door and it really functioned as declared - even our dog could walk through, no flies, no mosquitoes.
It is certainly not some paid advertisement but just the recommendation - sometimes, TV sales video could be true.


Read more "Magnetic Flying Insect Door Screen "

Aug 21, 2013

Play with cushions

cuchion final


Back from holidays, spent two weeks on the Adriatic seaside. It was good to get away from high temperature to the coast and enjoy swimming in the warm sea water. I love to craft something even when I am out of the town. This year I was refurbishing some furniture in our summer house and making plans to decorate the apartment - cushions are so great to add sent of romance or create certain filling. I made this one and other two few month ago, put them on (refurbished) sofa and  enjoy them during this vacations. And this is tutorial how to make such cushions - very easy and very quick, no buttons or zip.

Tutorial how to sew cushion or pillow case 


Size of the cushion: 40 x 40 cm

Material:

- cotton fabric
- strip fabric leftovers

pilow case scheme


pillow case scheme diagonal


You can see the scheme of the cushion - cut off three parts (because of the diagonal ribbons; otherwise, you don't need to cut the parts).  Be aware that seam allowances are NOT included in the scheme. Mark diagonal on the one 40x40 cm part. Cut on diagonal.

cushion case - ribbon


Cut off two ribbons out of different fabric (3 cm wide, add seam allowances). Sew the first ribbon on the cut off parts and the second one above (on the right side).

Sew another  40x40 cm part on one side and 40x18 cm on the other side of the ribbon part.

cushion case - ribbon


Make borders and turn a shorter part inside as on the photo and sew 'left' and 'right' sides together.

pillow case - backside


Cuchion case is finished - just put the pillow insert inside. On the photo you can see the backside of the cushion.
Read more "Play with cushions"

Jul 29, 2013

Apricot jam with lavender


Apricot jam is my favourite and every year I make some for my family and friends, love to give them as a gift for Christmas, birthday or just for love. This year I decided to try something different. I still have some jars left from last year ( my son spent one semester on KTH Uni in Sweden and he is the biggest consumer of the jam), so I decided to add lavender flavour to jam. It turned out delicious, apricot and lavender go really well with each other. And next year I'll try to add rosemary, not to the whole quantity. Original taste is still something I love.

Recipe: Apricot jam with lavender


Ingredients:


- apricots (I bought organic from a local farmer) - 4  kg (cca 2,8 kg after seeds are removed)
- 3 lemons
- 800g of sugar
- lavender flowers - about 8 flowers (be careful with lavender, the taste is strong)


Recipe:

Remove seeds, dice apricots (and put them in pot), add sugar and leave over night.


Decant juice in a separate pot and boil it for about 20 minutes.


In the meantime, peel the lemon (rub it if it is organic and save the peel), squeeze juice but save the rest and the seeds. Put this white part of lemon together with seeds in the gauze and add lavender flowers. Make a bundle (small bag) using cotton (kitchen) thread. 


Add apricots, bundle and lemon juice to pot with juice. Boil together for another about 15 minutes, then take the bag out. Chop up apricots with hand blender (mixing stick) and boil another 10 minutes, stirring occasionally.


In the meantime, clean jars put in oven on 110° C to sterilize them. Remove jam from heat and fill jars, put them back in oven. At this point I turn off the oven and leave jars until the oven is cold. After that, cut  cellophane pieces, 'wash' them using vinegar, put on jars and put the lids.
Read more "Apricot jam with lavender"

Jul 25, 2013

How to rotate photo in Blogger


Some time ago i was struggling with one photo - it appeared 'vertical' when viewing it but in Blogger it was 'horisontal'. It is still mystery for me why this happens, but I figured out how to solve this issue easy and quickly. I uploaded photo in Google Picassa (Google Photo albums now). You have feature to rotate photo (on the toolbar, next to 'More'). Just click it and the photo is rotated and saved. For the Blogger, choose  transfer from Picassa album.
Hope that some of you will find this tip useful, sometimes small hinbts could save a lot of time.


Photo after rotation in Picassa album


Read more "How to rotate photo in Blogger"

Jul 17, 2013

New life of an old sofa


It is always dilemma: throw away things or try to renew them and give them new life. Is it worth of effort or is it easier to buy something new? I usually prefer to renew my furniture and make something original or personalized. This sofa is one of the pieces I am very proud of.


This is how it looked like. I bought new fabric and sew covers, added pillows and made completely new sofa for our summer house on the Adriatic sea coast - that's why I apply nautical touch.

Some additional photos I took:


Read more "New life of an old sofa"

Jul 7, 2013

Decoupage with iron


Yesterday I was so desperate, but today I am thrilled. Few days ago decided to refurbish an old table using decoupage technique. It is  50 years old kitchen table,  in rather good condition, but the surface was covered with an old fashion plastic. It is the piece I will put on terase, in the garden, and buying special primer for plastic plus paint  of course, seemed too expensive. I thought that decoupaging would be cheaper and faster. So, I surfed a little bit to see available papers I could find here (didn't want to order on-line to wait for a few days for delivery). And here is the decoupage story.

Decoupage with ironing


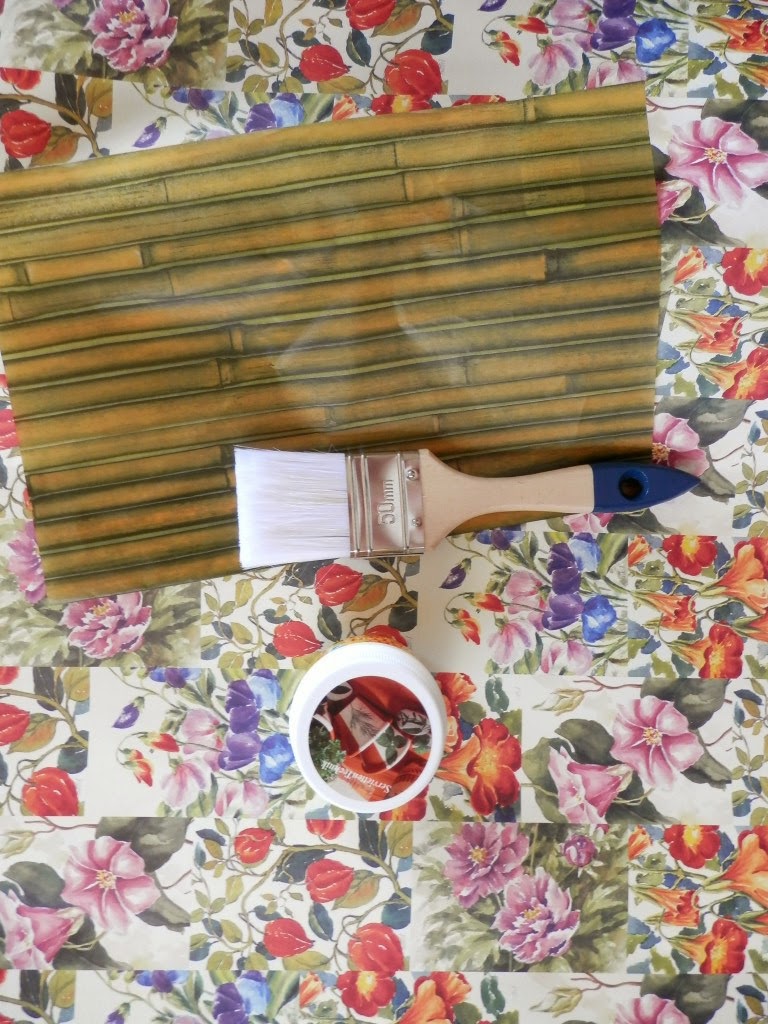
Finally, I bought two types of paper: Easy decoupage paper (really excellent for work) and Decopatch one that gave me so much trouble. Additionally, just to mention, you will need special glue for decoupage, brushes and cotton rag.

I saw the flyer in the shop declaring it as an  thin but firm, the colors and patterns were beautiful and I bought it. What a disappointment! I needed paper suitable for larger surface, not small pieces to combine together.


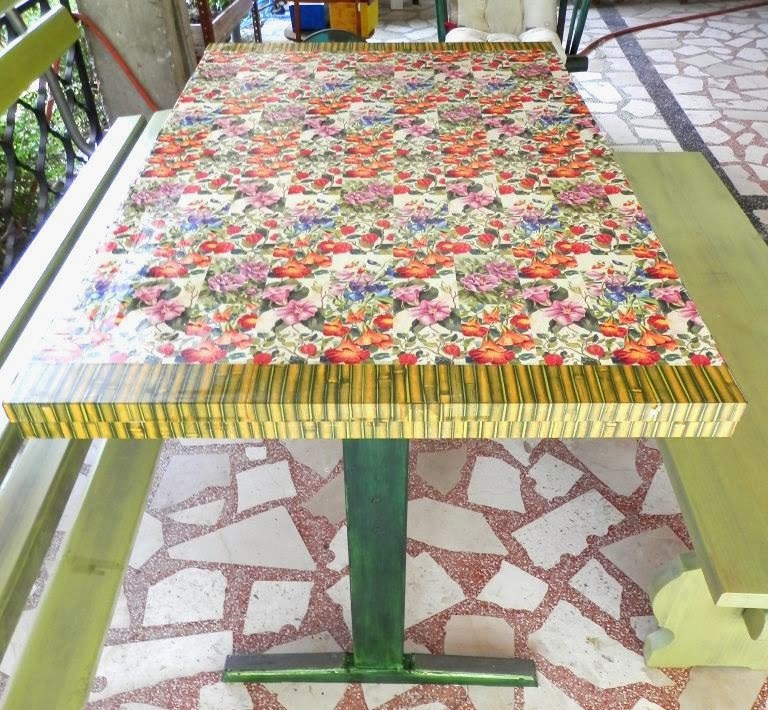
This is the table before refurbishment.

Fortunately, based on previous experience, started to work on less visible part, using usual decoupage technique - glue the surface and put the paper on. And it was fiasco - so many wrinkles and bubbles, I scraped paper off the table. Decopatch paper was just like napkin - very fragile, susceptible to wrinkles.


What to do? To buy another paper or to try something else? I was so dissapointed but out of the desperation  remembered another technique - ironing.  And this turned out to be  fabulous.


Steps for decoupage ironing


Step 1: glue the surface and let it dry a little bit (for a couple of minutes) (before that I marked the line on the table to now where to put the paper).

Step 2: Put the paper on the glued surface, tap it with cotton rag or dry brush (I preffer cotton rag) and put baking paper on it. This paper is rather transparent enabling control over the napkin or Decopatch paper in this case.

Step 3: Warm the iron on the low temperature  and iron over the baking paper. Napkin will be glued without wrinkles - it was miracle for me, after the disappointment the day before.
After the first table side, improved technique - cut the smaller paper pieces (up to 20 cm long) to better control the gluing.

Step 4: Seal the paper with the transparent varnish (or special decoupage glue).

Hints: Never touch the napkin (or paper) with fingers - use dry brush or cotton rag.


Easy decoupage paper (the flowered one) was really very easy to glue. First, of course, soaked it in water and then dried with tissue paper, glue the surface and put it on. It didn't wrinkled and I could tune it easily.

The table is still not completely finished, some details are planned and I will blog how I painted it next week.

Read more "Decoupage with iron"

Jul 3, 2013

Vertical garden journey - update

A month ago I started this project - set up a box to be my vertical garden and planted suculents. Last four weeks i was watering and spraying it and now it looks good, plants are in good condition, BUT I am so impatient, I would like to have a small 'jungle' immediately. So, need to continue nurish the garden and wait until the plants spread across the box.
See how I started in this post.
Read more "Vertical garden journey - update"