Showing posts with label Tips and Tricks. Show all posts

Aug 21, 2014

Create your own jam labels or tags using MS Word


There are thousands of label examples on the net, but i usually have my own idea, or the label I like the most can't be customized. One afternoon I tried to create label by myself, using MS Word (2010). It wasn't very easy ("&#%!@?!" for Microsoft), but neither so difficult. I prepared tutorial how to do it, just to remind you on the possibilities of the tool you probably have installed.


Tutorial how to create labels and tags using MS Word


The tutorial is related to Microsoft Word 2010 (I am mentioning that because, as usually, some features are improved, but for some of them, Microsoft made step back).

First, decide on the shape of your label.


On Insert tab use Shapes and choose the one you like - this time I added 'blue' shape (half circle).


You can change the size of the object buy dragging one of the small circles (green arrow) or you can rotate the object (red arrow) -  rotate this circle (of yellow color).


You can see that the object's size changed when dragged the small circle.


Changing color and outline


To pick up the desired color of the object, mist go to the Drawing Tools (upper right on the image).

Click on Shape Fill and pick up the color. Or you can choose No Fill if you don't want any color.


For the outline, procedure is very similar as above, only click on: Shape Outline. 


For  my labels, I chose the 'No Outline' option.

Want more sofisticated look? 


On the 'Shape Fill' pop up menu choose More Fill Colors for the color options or : Texture 

 รจ M ore Textures  for the other options available.


Now you can customize gradient, patterns, shadows, ... .  Try and play a little bit.


This is the example for the gradient.


And this is how to choose the pattern - I chose the dot pattern, of course.


Adding image and text


First step is to pick up image you like. I wanted to remove borders and how I did it read on my post here.

After you inserted the picture, right click on it - you'll get pop-up menu. Click on 'Wrap Text' and choose the Front of Text option. Now you can drag the picture on the created shape.


You  see the plums on the the shapes (previously I dragged the smaller shape and put it on the bigger one). 
To add text,  repeat steps Insert -> Shapes -pick up the Text box.


Input desired text, choose the font size and type. If you want additional customization, click on letter A  on the Tool bar - choose on of the offered options and, additionally, option Transform, if you like e.g. rounded text.
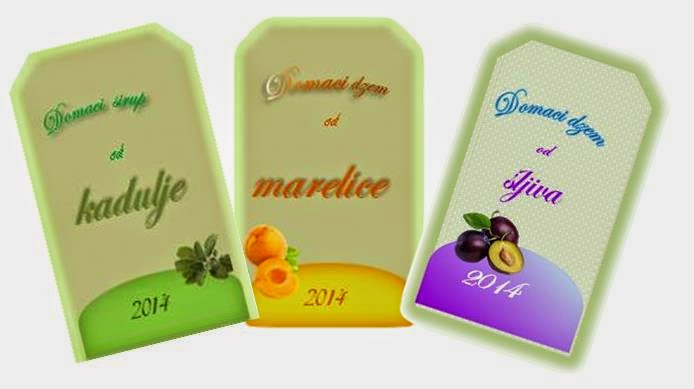


Label is finished. 


How to copy labels


Usually, I need more than just one label. The easiest way to copy it is first to select all 'parts' (select one by one and keep the Shift button pressed).


After selecting all components, click on the Group icon and choose Group. Now, you can Copy --> Paste your label as a single shape.


Hope this is helpful. may be there are some other ways to do some steps, I am constantly discovering  MS Word features or how to do something.


jar tag

jar tag


jar tag

jar label


Read more "Create your own jam labels or tags using MS Word"

Jul 18, 2014

Cheerful Summer Bag


Finally finished this cheerful summmer bag. Birds you can see are brooches so I will be able to wear them in the winter, too, to make my day. Tut for brooches find in this post.

Just to give you a short input how I made it: 


Original fabric is upholstery fabric I bought in Ikea. 


Decided to painted it - used acrylic paints for fabric I already had.


I like to have pockets in the bag, so I made a lining with zipper pocket on one side and plain pockets on the other.


After the bag was finished, just put my birds on it.


Read more "Cheerful Summer Bag "

May 14, 2014

How to erase or remove background from your photo - part two


This post is actually update of the previous post on the same topic. In the meantime I learned something new. First, the Clippingmagic is not absolutely free of charge any more - you can try it, but can't download photo without subscription: the lowest one is still very cheap - 2.99 $ for a one month usage and 15 downloads (15 photos edited, you can download as many intermediate results as you wish - this is quite sufficient for me) or 7.99 $ for 100 downloads per month.


How to improve the final result


Second, I would  like to show you how to improve the final result. Using Clippingmagic you can't achieve sometimes the result you expect - it depends on the background contrast and probably some other things. For the furniture pieces I couldn't get the straight edges everywhere. So, I used another (free) tool - PhotoScape to make corrections. Silly me, in the first place, used Clone stamps tool and Paint brush, but there is no possibility to draw the line with this tools. And, out of desperation, found easy and fast method - just used lines objects - this tool is present in the majority of photo editing software.

Photo above is related to the PhotoScape, but steps are the same in other software.

Step 1: Choose the 'line' shape

Step 2: Choose the white color of the the line (or the color of the background)

Step 3: Choose the thickness of the line (the very thin line probably won't work good enough)

Step 4: Draw the line just next to the edge you want to correct
Read more "How to erase or remove background from your photo - part two"

Apr 23, 2014

Wood stains - secrets, tips, how to apply


      Paint or wood stain  - what to use on the piece we are working on? And what is the difference?

     Wood stains are liquid pigments that dye wood, yet allow the grain of the wood to show through - in my opinion, that's the most important fact regarding the wood stain. They   bring out the work of the crafter. Paint, on the other hand,  covers up blemishes or less than ideal woods on a project. As a general rule, it takes more efforts and time when preparing the piece of furniture for stain then it is for paint, but I love to use it over paint whenever I can.

Types of wood stain


Wood stains can be water based, oil based or alcohol based, mixed with finely ground pigments. As for the paint, I prefer water based stain - it is much easier to clean the tools, and the dry faster. But,which type of wood stain to use depends also on the type of wood - for the most porous wood (almond tree, birch, poplar) any type of stain is OK. For other, less porous, alcohol-based ones are better. 

Regarding opacity, there are basically two different types:
- low-build wood stains allowing enhanced wood structure appearance
- medium or high-build stains that are rather opaque (something between stain and paint, not my favorite)


Stains are designed to soak into the wood, but those marked as outdoor form a thin film on the surface in order to protect the wood.


Preparations


Good preparation is essential for the good results, especially in the case of wood stain. 
This means sanding, sanding, sanding - sand the piece you are working on a few times, using progressively finer grits of sandpaper (larger number  = finer grit).  For flat surfaces I am using sander - it is much easier. Usually I start with the paper grit 80 and finish with the paper grit 120. And remember, always sand with the  grit. Next step is to to get rid of all of the sanding residue. Use vacuum cleaner (with brush) first, then wet clothes (repeat the cleaning with the cloth as many times as necessary; after sanding, this is the easy part).


How to apply a stain

That depends on the type of stain. In the case of oil-based stains use  natural bristle brush, whereas a water-based stain could be  applied using a synthetic brush or a roller. Some crafters use clean cloth to apply stain, I tried this, but it didn't work well for me.
Whatever you choose, try to apply first on the part of furniture that is not visible. For closets, I am using the back side of it to test colors and patterns. For tables, i am using bottom side of the table. It is always good to test the ideas first, and then make final decision.

Protecting stain


I am usually always protecting the stained piece with the transparent varnish.
Be sure to read the instructions on the can before applying it, and  do not shake the can before applying it (as this introduces bubbles that could mar your surface).

Tips and tricks

a. In more porous parts of the wood (eg. around knots), the absorption of the tint will vary - to minimize that, if you don't like it, use pre-stain wood conditioner.

b.  Read the instructions before you apply the pre-stain conditioner or stain. In some cases,  you are advised to wipe the conditioner off after a few minutes, and then apply the stain within two hours. So you may have to plan your time accordingly. 

c. For water - based stains, before applying the first layer of stain, lightly wet the wood. This will help to produce an even spread of the stain.


Read more "Wood stains - secrets, tips, how to apply"

Sep 8, 2013

How to remove white stains on furniture


white stain on furniture

white stain on furniture


I am in the 'cleaning' mood these days - it is warm but not hot here, no raining and just perfect weather to bring some order in the house. So, I moved all things from the big round table we have in the dining room and saw these nasty white stains. How to clean them?  - asked Google, of course. And found some interesting tips. First, tried with a mix of olive oil and vinegar - no result. Then tried with mayonnaise - no result again.


iron on white stain on furniture


The third attempt was bingo - took travel iron (because it is small and has no steam), old cotton rug and 'ironed' over the stain for a few minute. The result was amazing - stain was merely visible. Repeated with another one and now my table looks  almost as good as new.


Anyway,  If you decide to do the same, be careful and try first on a small spot. I am not sure why this worked for me and would it be as good on some other type of the furniture.
Read more "How to remove white stains on furniture"

Sep 2, 2013

How to clean and preserve brushes


When I began to refurbish furniture, read tons of material about paint, wood preparations, primer, fillers. I took brushes 'for granted', thought I knew enough about them. But after some bad experience figured out I have to improve my knowledge with this topic as well. First, learned which brushes to use with acrylic paint and which with oil one (see my post How to choose paint brushes). Cleaning and preserving brushes is important task, particularly if you buy better (and more expensive) ones, which I prefer. I usually use acrylic paint, cleaning tool is one of the reason - running water is the easiest way for that. With the solvent for oil based paint I can never achieve the same result. Be aware that tips below are just for the acrylic paint brushes.


Anyway, use cold running water to clean brushes immediately after the painting. Warm water will fix the acrylic resin (paint component) and paint will be sealed up for the metal part of the brush. After the washing, use paper towel or cotton rag to absorb the excess water and leave it to dry.

Keep brushes with the hair up.

From time to time it is good to make a bath for your brushes you are using the most: mix one tea spoon of sodium bicarbonate (or just one package of baking powder) with two dcl of water and put yout brushes in this solution, leave them over night. In the morning, rinse them thoroughly in cold water, use paper towel to absorb the excess water and leave them to dry. Soda releases oxigen which is very strong cleanser.

Read more "How to clean and preserve brushes"

Jul 25, 2013

How to rotate photo in Blogger


Some time ago i was struggling with one photo - it appeared 'vertical' when viewing it but in Blogger it was 'horisontal'. It is still mystery for me why this happens, but I figured out how to solve this issue easy and quickly. I uploaded photo in Google Picassa (Google Photo albums now). You have feature to rotate photo (on the toolbar, next to 'More'). Just click it and the photo is rotated and saved. For the Blogger, choose  transfer from Picassa album.
Hope that some of you will find this tip useful, sometimes small hinbts could save a lot of time.


Photo after rotation in Picassa album


Read more "How to rotate photo in Blogger"

Jul 7, 2013

Decoupage with iron


Yesterday I was so desperate, but today I am thrilled. Few days ago decided to refurbish an old table using decoupage technique. It is  50 years old kitchen table,  in rather good condition, but the surface was covered with an old fashion plastic. It is the piece I will put on terase, in the garden, and buying special primer for plastic plus paint  of course, seemed too expensive. I thought that decoupaging would be cheaper and faster. So, I surfed a little bit to see available papers I could find here (didn't want to order on-line to wait for a few days for delivery). And here is the decoupage story.

Decoupage with ironing


Finally, I bought two types of paper: Easy decoupage paper (really excellent for work) and Decopatch one that gave me so much trouble. Additionally, just to mention, you will need special glue for decoupage, brushes and cotton rag.

I saw the flyer in the shop declaring it as an  thin but firm, the colors and patterns were beautiful and I bought it. What a disappointment! I needed paper suitable for larger surface, not small pieces to combine together.


This is the table before refurbishment.

Fortunately, based on previous experience, started to work on less visible part, using usual decoupage technique - glue the surface and put the paper on. And it was fiasco - so many wrinkles and bubbles, I scraped paper off the table. Decopatch paper was just like napkin - very fragile, susceptible to wrinkles.


What to do? To buy another paper or to try something else? I was so dissapointed but out of the desperation  remembered another technique - ironing.  And this turned out to be  fabulous.


Steps for decoupage ironing


Step 1: glue the surface and let it dry a little bit (for a couple of minutes) (before that I marked the line on the table to now where to put the paper).

Step 2: Put the paper on the glued surface, tap it with cotton rag or dry brush (I preffer cotton rag) and put baking paper on it. This paper is rather transparent enabling control over the napkin or Decopatch paper in this case.

Step 3: Warm the iron on the low temperature  and iron over the baking paper. Napkin will be glued without wrinkles - it was miracle for me, after the disappointment the day before.
After the first table side, improved technique - cut the smaller paper pieces (up to 20 cm long) to better control the gluing.

Step 4: Seal the paper with the transparent varnish (or special decoupage glue).

Hints: Never touch the napkin (or paper) with fingers - use dry brush or cotton rag.


Easy decoupage paper (the flowered one) was really very easy to glue. First, of course, soaked it in water and then dried with tissue paper, glue the surface and put it on. It didn't wrinkled and I could tune it easily.

The table is still not completely finished, some details are planned and I will blog how I painted it next week.

Read more "Decoupage with iron"

Jun 8, 2013

Preserve the beauty, press flowers


While the nature flourish it is good to recall the winter and preserve its beauty, especially when it doesn't take much time and effort. It is very  easy to press flowers or leaves.


Today I cut some flowers in my garden and few ginkgo leaves, I planted small tree few years ago.


Thin, flat flowers are the best for pressing. Place absorbent paper ( paper towel or tissue paper) in the middle of some heavy book and arrange the flowers blossoms. Cover with another piece of paper, close the book, put another one on the top of it for weight and forget for a few weeks (or few month in my case).


I also have some roses and pressed their petals.


That's it, now I'll have memories and variety of pressed flowers for my projects. 
Read more "Preserve the beauty, press flowers"